Date posted: August 24, 2010
- Types of LEDS and Power Sources
- LED Characteristics and The Simple LED Circuit
- More Series LED Circuits
- Parallel LED Circuits
- LED Circuit Tools and LED Strip Kits
- Wiring Standard Bulb LEDs
- SMD LED Circuit Wiring
- LED Wiring and Current Check for Battery Power
- Placing your LED circuits on your RC Craft
- Remote Controlling your LED Circuit
- Painting With Flight
– Download Remote Controlling your LED Circuit as PDF –
Control your LED Circuits with your receiver – using simple components like brushed ESCs or remote controlled relays. Add some mixing and you can not only turn them on or off, but also dim your lights.
Remote Control – Flick that switch!
Remote controlling your lights is a completely optional addition to your LED circuit. There’s no need for it, but it’s got a cool factor that can’t be beat. Consider the capability of remotely controlling your lights without having to manually land and connect them.
Not only that, but you can use mixing capabilities of your transmitter to control brightness levels (based on how you do the wiring). I’ve used a dial on my transmitter to dim the lights to my preferred brightness level based on the light outside or if I’m taking photos. You could also mix them to say, your throttle… Beef up the juice and your afterburners begin to glow!
So let’s take a look at the basics. You can buy receiver controlled dimming switches, or you can just take a simple BRUSHED ESC and adapt it to your LED needs. If your receiver controlled switch is a simple on/off toggle, you can’t dim your LEDs, but a brushed ESC will let you dim to your heart’s dimming desire.
The Brushed ESC circuit
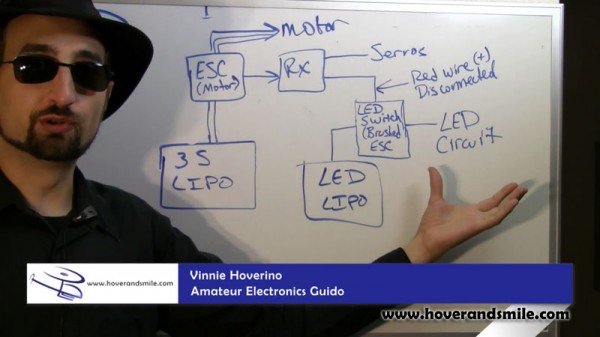
Consider our diagram with Vinnie at the helm:
The entire upper left portion of this diagram is exactly the basic configuration you’ll see in any electric flyer. The rest of the circuit for the LED circuit utilizes a BRUSHED ESCto work as a remotely controlled voltage regulator. We take our brushed ESC and instead of plugging it into the throttle channel (since we already have our primary ESChandling throttle), we plug it into an open receiver channel for switching.
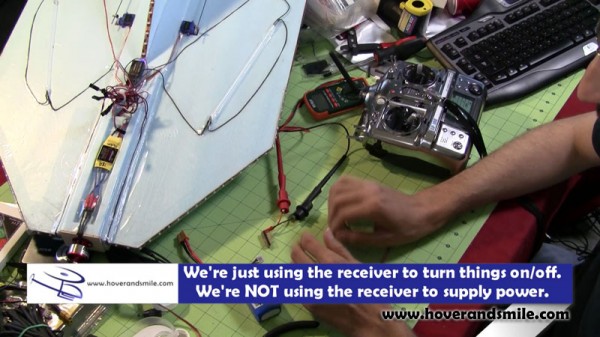
But we don’t plug in the brushed ESC to your receiver completely. We want to removethe red wire from the servo plug from our brushed ESC. Clip it or slide it out of your servo connector, tape it off with electric tape and leave it alone. You’re only plugging the brushed ESC into your receiver for common ground and signal, only two of your three wires are used.
Now, that’s where the servo connector from our brushed ESC is used. As for the rest of the cables, you’re plugging the power cable to your brushed ESC into a battery – either your flight pack battery or a separate lipo.
What about the LED circuit? It plugs into the brushed ESC where you’d normally connect a motor. See the connection? We’re using a brushed ESC just as you would in a regular plane, except instead of using your receiver to drive throttle of a motor, we’re using our receiver to drive our LED circuit.
I used a simple GWS Brushed ESC here, it can accept two or three cell Li-Po batteries, and since my circuit is designed for 12 volts, we’ll be just fine.
I’ve used this setup on a gear switch open on my receiver. Plugging in my brushedESC for my LEDS into that open channel (RED WIRE DISCONNECTED), plugging the flight pack battery into my brushed ESC’s power, and then taking the output of that power into my LED power block, I’ve got total control of the LEDs from a simple on/off standpoint.
But what about dimming? How do we gradually turn lights on or off? You’ll need to learn your transmitter’s mixing to control your brushed ESC to vary it’s voltage from off all the way through on. My transmitter has a dial, so I can control complete dimming.
Remember, the brushed ESC is a voltage regulator – you can use it to control full on/full of switching, or dimming ‘in-between’ full on and off.
Remote Controlled Relay Switches
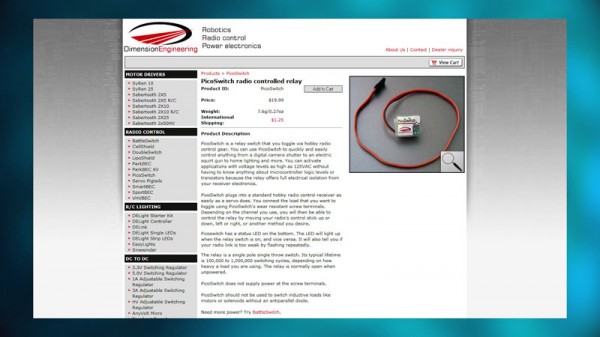
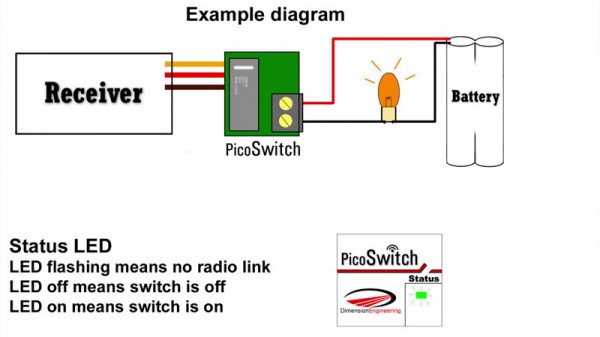
If you don’t want to use or have a brushed ESC to use, you could purchase a remote controlled receiver switch. Here’s an example – a Pico Switch from Dimension Engineering.
The circuit is just like our brushed ESC – we connect to a receiver channel, but thePOWER for our circuit comes from the other side of the switch:
We’ve not tried the Pico Switch, but it’s the same as brushed ESC, although it may not allow for partial voltage regulation, so you may not get dimming out of this (in fact, I’m assuming it’s just a simple on/off relay).
Either way, from a remote controlled relay switch, remote controlled dimmer, to brushed ESC, experiment with controlling your LEDs remotely!
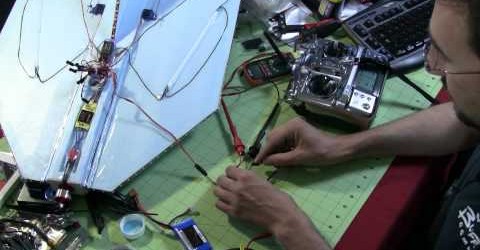
Always the useful tool, a voltmeter is a great way to watch the voltage allowed through your circuits as you’re turning dials or flicking switches.






1 Comment
Walt
07/11/2011
Great,Helpful,Useful, info Thanks!!!
No trackbacks yet.