
Date posted: September 25, 2009
– Download Helicopter Test Stands Are Go as PDF –
Pops and myself, with help from Jax, mass produce Helicopter Test Stands…If a couple count as mass production. Eli Whitney would still be proud.
As I was performing my ritual browsing of YouTube videos related to RC Helicopters, I stumbled across a video presented by NightFlyyer covering the topic of building a helicopter test stand of his own design. As soon as I saw it, I e-mailed my father with the title ‘Let’s Build This!!!!!’, and over the next few weeks we went searching for parts, based on NightFlyyer’s part list that someone sending NightFlyyer a message can ask for.
Although NightFlyyer references this as hover testing, that’s not the point of our building this, and I personally don’t feel comfortable using it for hover training. I think that’s what a coaxial and simulator are for, myself.
However, I do like the idea of having these stands available while you’re tinkering with the helicopter. Since so many pending modifications are going to be first times for me, I wanted to be able to have a somewhat controlled environment to allow the helicopter to still move, but not actually lift off. Items such as servo replacement, gyro work, TX/RX swapping, etc. Just a little extra insurance.
List in hand, we hit numerous home improvement and art supply stores looking for basically the pieces you see here: (Jax, the Springer Spaniel, is not sold at home improvement or hobby stores, I’m afraid)

Jax helps out with our test stand construction.
The design itself is fairly simple. A base, sliding dowel inserted into a pipe, and a mounting surface on top of the dowel. We didn’t necessarily use the exact part measurements, but for the most part this is following NightFlyyer’s pattern.
The base has a rounded bolt on the bottom for pivoting (we didn’t have a long enough bolt to go past all of our foam blocks we attached, so we’re still looking to swap that out at some point), with a flange on the opposite side for the galvanized pipe.

Heli Test Stand Progress

Heli Test Stand Progress

Heli Test Stand Progress
On the side that will be resting on the floor, we secured the foam blocks. In hindsight, I’m thinking we might have used too many, however I do know that our blocks are too thick, which is why we’re looking to find a longer bolt, instead of trying to chop down blocks of foam with extreme precision.

Heli Test Stand Progress
Creating the sliding dowel mechanism that inserts into the spring-loaded pipe:

Heli Test Stand Progress

Heli Test Stand Progress
NightFlyyer uses a bungee cord to attach the dowel to the pipe. We followed the same pattern, but Pops is working on some variations to this, such as a stopper inside the pipe instead of using a bungee cord, which would help for any rotation-related movement testing.

Heli Test Stand Progress
Drilling into the dowels was a bit cumbersome, Pop was afraid the wood would split, so a bit of extra care was taken for that step. Similar to the reference design, but with an added washer to smooth out the intentional tilt of the mounting plate:

Heli Test Stand Progress
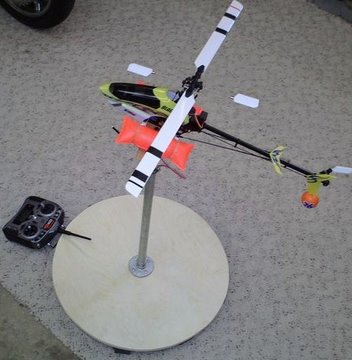
Finally, with the stands completed, it’s time to strap on a helicopter and test it out!

Heli Test Stand Progress

Heli Test Stand Progress

Heli Test Stand Progress
Spending the day building these stands (or…giving Pop a chance to play with all of his cordless tools) was a fun time, and everything went really well. I don’t think a single curse word was uttered the entire time out of angst. We’re originally from New York. Those last two sentences should say it all as to how well the construction went.
Now, there are still some modifications we’re looking at making. As I referenced before, we need a longer bolt to compensate for the thickness of our foam. Also, I need to work on how the helicopter mounts to the plate, although I’m perfectly fine with the rubber bands, after the first test flight I’d like to work on the plate itself. Some type of adjustable weight to place on one end of the plate, or perhaps a different size plate to use. Why? Well, although we’re NOT using this for hover practice, I would like the plate to balance a little better with the helicopter. Mounting the CPP2 in the video shows that it was a little tail heavy. However, as each helicopter will be just a bit different, we’ll have to work on an adjustable method of plate balancing as necessary.
The balancing isn’t required for the type of testing we’re looking to use this for, it falls under the category of ‘nice to have’.
Here’s our construction video, and an appropriate music score, in my opinion. Taking all of the video shot that day and losing one foam block SOMEWHERE in the house really started putting the idea in our heads that this was a very ‘Benny Hill’ style of video just waiting to be born.
Thanks to Jax for fulfilling his supervisory role.

Here is NightFlyyer’s video which inspired this article:


2 Comments
Pizza
07/07/2011
hi! do u still sell these stands? internationally? i need it urgently for my project. can’t seem to find the parts locally in my country.
Eric Krystof
07/07/2011
Pizza,
These were never really in production, as we’re not a business as much as just a journal of sorts, and I’m afraid my time and resources are too limited to take orders. Truth be told, while useful for testing a build, I’d don’t recommend them for hovering, but in lieu of having one, you can always slide some rulers or tubing under the skids and lock them down to a table or floor. Better yet, make some training gear so if during a test it keels to one side or spins around, you can drop it safely to the ground. Look for RC helicopter training gear, long carbon fiber tubes with plastic balls on the end, easily made on your own and a lot less parts than the stand!
No trackbacks yet.